Last Updated: March 5, 2025
Hover fields are a great way of displaying certain data fields when you hover over something in your map. When you add point data, you can simply right click on the layer and select Choose Hover Fields to pick the data to display.
When you add your own data to an area layer (e.g. Adding Sales Data to the ZIP Code layer), you need to create a copy of the area layer to use the Hover Fields from. The following steps go over how to create a copy of your area layer that lets you choose your own fields as hover fields. In the example I am using, I have joined the Sample Customer file from the tutorial folder to the 5 Digit ZIP Code layer and want to use N My Customers as a hover field:- Right click on 5 Digit ZIP Code in the Display Manager and choose New Dataview.
- Choose to view My Data and click OK.
- Go to Dataview>Fields>Show/Hide or click
 .
. - Click Clear.
- Highlight ID and click Add.
- Highlight ZIP and click Add. (If you are using a different layer than the ZIP Codes use the field that identifies each area, e.g. Name)
- For each field you want to include as a hover field, highlight it and click Add. (e.g. highlight N My Customers and click Add).
- Click OK.
- Go to File>Export>Geography.
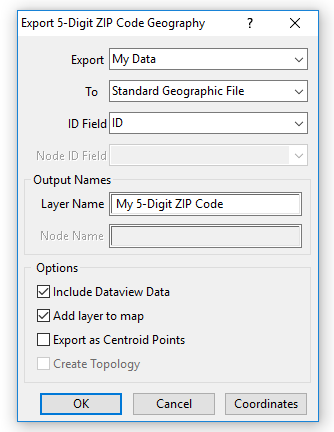
- Set up the following:
- Export My Data
- To Standard Geographic File
- ID Field ID
- Layer Name as whatever you want e.g My 5 Digit ZIP Code
- Make sure to change it from the original so that you can tell the difference
- Make sure Include Dataview Data and Add layer to map are checked

- Click OK and choose a location to save the layer. Click OK.
- A new layer will be added to your map (the name being your choice in Step 10, part d).
- Right click on the layer in the display manager and select Choose Hover Fields. Pick the fields you want from the list (the available fields will be those picked in Step 7.)
