Last Updated: March 5, 2025
You can calculate driving times for multiple points using route planning software.
Calculating the distance and travel time from a set of customers to stores or from a single ZIP Code to a set of destinations can provide valuable insight into your business’ operations.
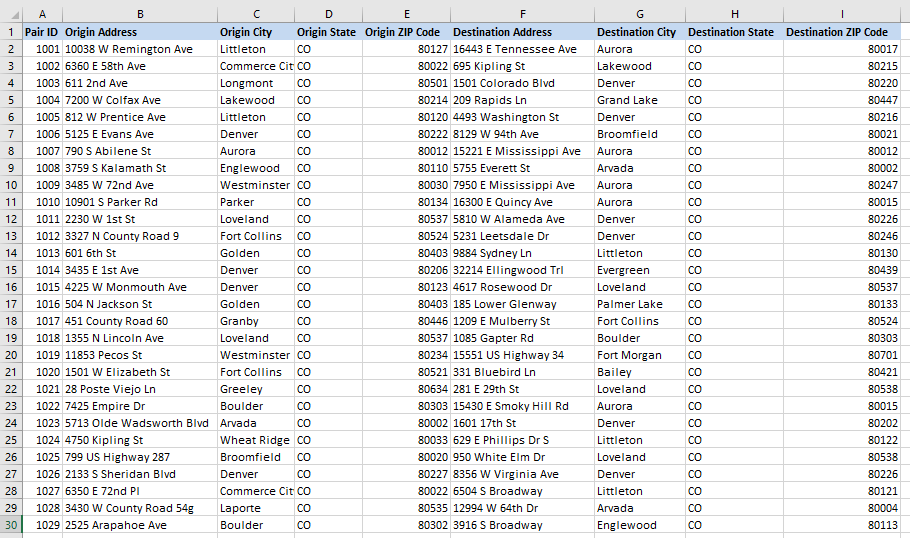
You may have data formatted like the image below and may want to calculate the distance and travel time from the origins to the destinations.

This article goes over how we can modify how we use the Distance and Travel Time Tables tool in Maptitude to do this point-to-point calculation.
For a video tutorial on the same tool, see: https://www.caliper.com/learning/media/creating-travel-time-tables/
To follow the steps below, you will need your data formatted like the above table, with a Pair ID column that uniquely identifies each row and the Address, ZIP Code, City/State columns for the origin and destination are on the same line.
Step 1: Locate the Origin and Destination Layers
We will locate the data twice: first using the origin fields and then using the destination fields.
- Download a free mapping software trial of Maptitude Desktop or use your existing Maptitude Desktop license.
- From the Maptitude Home Window, choose New map of my data/table and click OK
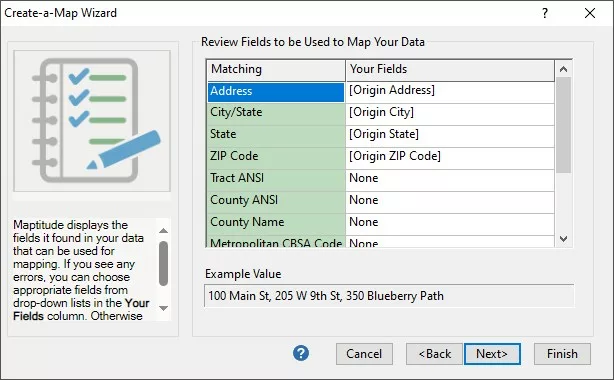
- Select your sheet of data and on the Matching Fields screen, choose the Origin Location fields:

How do I Calculate Multiple Point-to-Point Driving Drive Times at Once? Origin Locating Settings. - Finish the rest of the Create a Map Wizard as normal. When the map is created, right click on the layer you just created and choose Rename. Rename the layer Origins.
- Choose Map>Add Table/Spreadsheet to a Map and select the same sheet of data
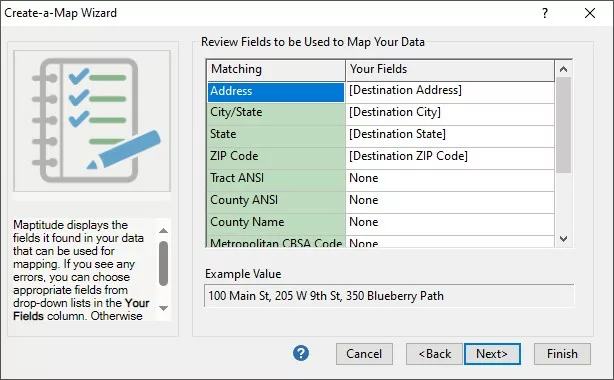
- This time on the Matching Fields screen, choose the Destination Location fields:

How do I Calculate Multiple Point-to-Point Driving Drive Times at Once? Destination Locating Settings. - Finish the rest of the Create a Map Wizard. Rename this layer Destinations.
This should produce a map with your origin and destination locations plotted as separate layers.
Step 2: Calculate the Drive Times
- Choose Tools>Routing and Directions>Distance and Travel Time Tables
- Choose Origins as the origins and Destinations as the destinations. Make sure the Name field on both is set to Pair ID.
- Uncheck Open in Excel
- Click OK
Maptitude will calculate all the drive times/distance and create a table with the results
Step 3: Filter the Table
- Make sure the table of drive times is the active window.
- Choose Selection>Select by Condition
- Type in the Condition [Origin Pair ID] = [Destination Pair ID] or build it with the Condition Builder
This will produce the filtered table for the drive time/distance for just the pairs we want. Now, all we need to do is join it to the Original data.
Step 4: Join to the Origin Layer
- Go to the Map and right-click on Origins in the Display Manager and choose New Dataview
- Go to Dataview>Table>Join
- Under Joining From, choose Origins as the Table and Pair ID as the Field
- Under To, choose File Open… and open the Excel File you just saved
- Choose Pair ID as the Field
- Click OK
- Choose File>Export>Table… and save this as an Excel file
