Last Updated: May 30, 2024
You can move Alaska and Hawaii for presentation purposes using United States GIS mapping software.
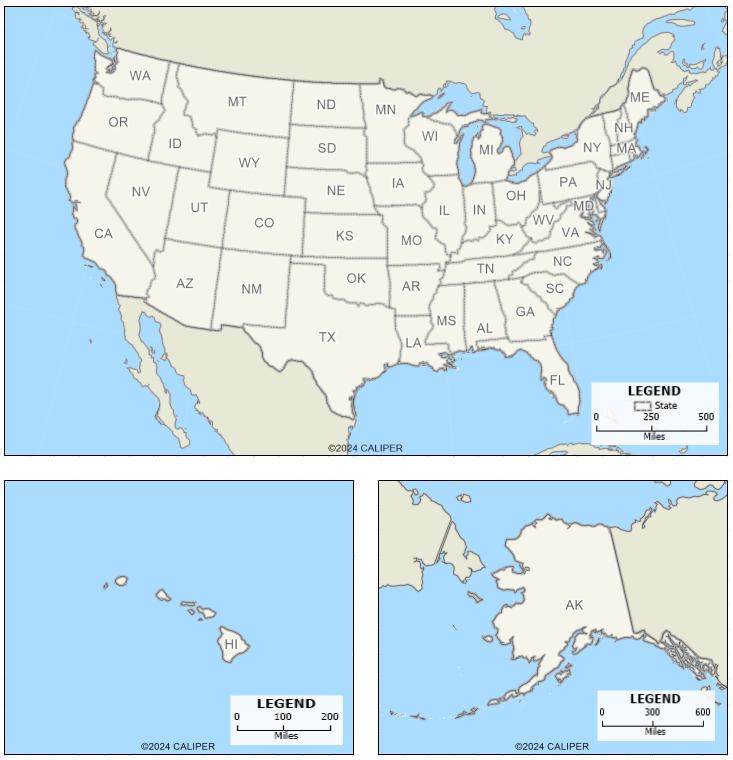
When mapping your data, whether they are sales territory maps or customer density maps, you may want to show Hawaii and Alaska on the same report.
The best way to accomplish this is to create a layout report in Maptitude mapping software.
To try these steps for yourself, you can use your Maptitude Desktop license or request a free trial of Maptitude.
First, add the mainland US to a layout report:
- If you are creating a new map from the Home page, select New map of the United States and click OK. You can also try the steps below once you have finished creating a map with the data that you need.
- Make sure that the legend in the map shows the scale bar. To change how the scale bar looks, you can right click the legend in the map and choose Properties. Then, change the Scale drop down to the desired style.
- Go to Tools>Reports>New Layout to create a layout report.
- Use the Place Map/Dataview in Layout button to click and drag on the map to place the map of mainland US.
- You can check Use actual point sizes to keep the sizing of labels and map features in the layout consistent.
Then, add Hawaii to the layout report:
- Go to the Window menu in the top left to return to the map.
- Go to Map>Duplicate to duplicate the map.
- Use the Edit>Find feature to zoom to Hawaii. You may need to use the Display Manager to show/hide certain layers to match the mainland map in your layout.
- Right click the legend in the map and choose Properties.
- Go to the Contents tab and uncheck all the checkboxes, this will only show the scale bar in the legend. Click OK to confirm.
- Optionally, you can resize the map by clicking and dragging the corners of the window to be sized relative to how they will be in the layout. In this case, size the map window smaller relative to the mainland US map.
- Go to the Window menu in the top left to return to the layout report.
- Use the Place Map/Dataview in Layout button to click and drag on the map to place the map of Hawaii, making sure to include the scale bar in the layout.
- You can check Use actual point sizes to keep the sizing of labels and map features in the layout consistent.
Finally, add Alaska to the layout report:
- Go to the Window menu in the top left to return to the map.
- Use the Edit>Find feature to zoom to Alaska. You may need to use the Display Manager to show/hide certain layers to match the mainland map in your layout.
- Optionally, you can change the projection of the map to ‘rotate’ the map view (for more information on map projections, please see the help article on changing map projections in Maptitude):
- Right click anywhere on the map and choose Properties.
- Uncheck Auto Projections and click Change Projection.
- Change the Class drop down to The Polar Regions.
- Click OK and OK to confirm.
- Optionally, you can resize the map by clicking and dragging the corners of the window to be sized relative to how they will be in the layout. In this case, size the map window smaller relative to the mainland US map.
- Go to the Window menu in the top left to return to the layout report.
- Use the Place Map/Dataview in Layout button to click and drag on the map to place the map of Alaska, making sure to include the scale bar in the layout.
- You can check Use actual point sizes to keep the sizing of labels and map features in the layout consistent.
The layout will now contain maps for the mainland US, Hawaii, and Alaska.
Once you are done, you can export the map by going to File>Print or File>Export>…
For more information on creating a layout report, please see the tutorial video or webinar on creating layout reports.