Last Updated: March 5, 2025
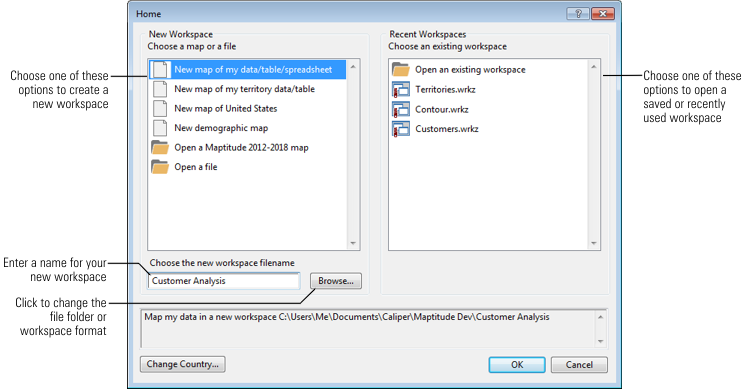
The Home Window in Maptitude 2019 is the starting off point for using the software. You will see this window when starting up the software, or when you go to File>New Workspace. If you are not seeing the Home Window when you start up the software, you can turn this feature back on by going to Edit>Preferences. Under the System tab, check the box labelled Display the Home window on Startup.
 There are a few options available on the Home window to allow you to efficiently find the right starting step. The options are divided into two main groups:
- On the left you have several options for creating a New Workspace. If you don’t have a Workspace file (*.wrkz or *.wrk) you will want one of these options to create the Workspace.
- Maptitude 2019 requires that all of your maps be open in a Workspace. If you are creating a new Workspace, you specify the name for the Workspace and, optionally, you can click Browse to change the folder where the Workspace file should be saved or change the Workspace to a different format (WRKZ or WRK). See What is a Workspace File and How do I Use it? for more information.
- On the right you have options for opening Recent Workspaces. If you have a Workspace file you have made already or a Workspace file was shared with you, this side of the Home Window will let you open it.
| Option | What it does… |
| New map of my data/table/spreadsheet | Choose this option to if you want to create a map that helps you visualize data stored in a table/spreadsheet/file and visualize it on a map. When you click OK, Maptitude will prompt you for the location of the file to use and launch Create-a-Map Wizard™ to guide you the rest of the way. See Mapping My Own Data in the Maptitude Help for more information. |
| New map of my territory data/table | Choose this option if you want to create a map of territories (such as sales territories or school districts). When you click OK, Maptitude will launch the Territory Wizard to guide you through the steps of creating a territory layer. See Creating Territories in the Maptitude Help for more information. |
| New map of {country name} | Choose this option if you want to create a map of a particular location within the chosen country. If you have more than one Country Package installed, you can click Change Country to choose a different country to use. When you click OK, Maptitude will launch Create-a-Map Wizard where you can specify the area to display on the map. See To Use Create-a-Map Wizard to Create a Country Map in the Maptitude Help for more information. |
| New demographic map | Choose this option if you want to create a map that uses some of the demographic data that are included with Maptitude. The available maps will depend on what country package that you have installed, but may include options such as population, income, housing, age, and race. When you click OK, Maptitude will launch the Map Librarian where you can specify the map, level of detail, and location to display. See Using the Map Librarian in the Maptitude Help for more information. |
| Open a Maptitude 2012-2018 map | Choose this option if you want to see a Maptitude .MAP file that you created in an earlier version of Maptitude in your workspace. When you click OK, Maptitude will prompt you for the .MAP file to import into your workspace. See How do I Open a Map I Created in a Previous Version of Maptitude? for more information |
| Open a file | Choose this option if you want to create a map using one or more Caliper geographic files or other geographic format files such as MapPoint .PTM or Esri Shapefiles. When you click OK, Maptitude will prompt you for the file to open in your workspace. See Using Other Geographic File Formats in the Maptitude Help for more information. |
