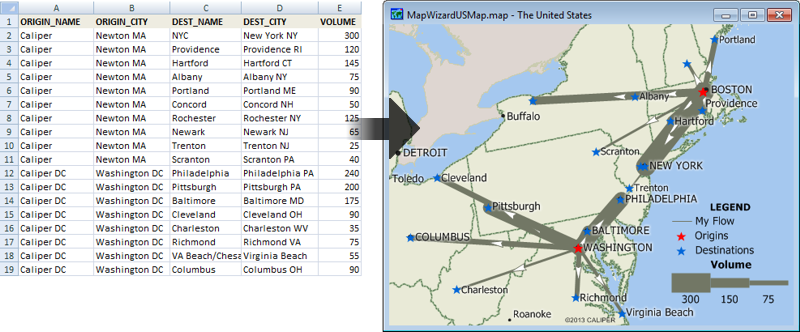
The Flow Lines Tool Add-In provides an easy way to show volumes going
from origins to destinations. This tool assumes you have 2 layers of
locations (typically points, but you can also use areas to show flows
between zones, for example). The first layer contains the origins and the
second layer contains the destinations.
A typical scenario is where you have:
- An equal number of origins and destinations
- A spreadsheet of your origin and destination addresses, each on a
single row such as:

- Origins with multiple destinations are listed separately in each row
with the origin repeated for each destination, such as:

To install:*
- Download the file FlowLinesTool.exe.
- Open the file or choose the Run command from the Start menu, and
browse to the FlowLinesTool.exe file in the folder where you
downloaded the file.
- Click OK and follow the step-by-step instructions to install the
add-in to the appropriate program folder (e.g. C:\Program
Files\Maptitude\)
To use the Flow Lines Tool Add-In
- Open your table or spreadsheet containing the origins and
destinations. If prompted, make sure to Import your
Excel spreadsheet.
- Geocode your origin locations. For example, choose
Tools-Locate-Locate by Address or
Tools-Locate-Locate by City, and be sure to use the
origin
address, city, and postal code fields. Name the new layer
Origins.
- Again open your original table or spreadsheet. If prompted, make
sure to Import your Excel spreadsheet.
- Geocode your destination locations, being sure to use the
destination location fields and name the new layer Destinations.
- Now that you have two geocoded point layers, one of origins and one
of destinations, make your origin layer the working layer.
- Choose Tools>GIS Developer's Kit>Add-Ins>Desire/Flow Lines Tool
to open the Desire Lines dialog box.
- Choose your origin and destination settings.
- Choose the Volume field from the destination layer.
- The optional Name field choices are simply used to
show the origin and destination attributes for each flow line created.
- If you have the same number of origins and destinations, uncheck the
One to Many Flows box (each origin has volumes going to one
destination). Otherwise, check the box if you want to show volumes going
from every origin to every destination (unusual).
- Click OK.
- Enter a name for the new desire line layer and click Save. Maptitude creates the flows layer and displays it on the
map.
*NOTE: The Flow Lines Tool add-in works only with latest version
of Maptitude.

Using the Flow Lines Tool add-in, you could create desire line flows
illustrating the volume of flow between origins and destinations.


