Learn more about how Maptitude can help your organization: Marketing & Sales Mapping Software
|
Updated Curriculum for 6.0
The new and updated curriculum reflects the features in the recently released Maptitude 6.0. Space is limited, so register online as soon as possible. If you have any questions, please call Maptitude Training (USA) at +1 617-527-4700, or send an e-mail to sales@caliper.com.
Caliper also offers several training options:
•
Instructor-led classroom training
This month's free resource is a new training video: |
|
|||||||
|
Featured Data
Product: Redistricting Data DVD with 2010 Census Data
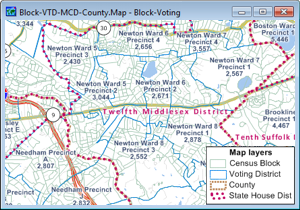
The product reflects a decade of improvements by the US Census Bureau to the spatial accuracy and completeness of the data. The boundaries include redistricting data as well as limited Census Demographic Profile data. Included are 2010 Census population counts for the total population, for those 18 and over, and for race and ethnicity. Also included are total housing units broken down by whether they are vacant or occupied. The DVD includes two base maps that make it easy for you to start using the data: one for the Census Block-Block Group-Tract-County hierarchy, and another for the Census Block-Voting District-County hierarchy. Price: US$1,000 per state, US$500 per county. Please call Caliper (USA) at +1 617-527-4700 to place your order. |
|||||||||
|
Maptitude allows you to add layers to or remove layers from a map (see the training video), change the order in which the layers are drawn, hide a layer temporarily without removing it from a map, make a hidden layer visible again, and rename a layer. You make all these changes using the Layers dialog box. You can add layers as follows: 1. Choose File-New, choose Map, then choose General Purpose Map and follow the prompts to map your area of interest. 2. Choose Map-Layers and Click Add Layer to display the File Open dialog box. 3. Browse to the c:\ccdata\ folder (the default location Maptitude uses to install layer files) and choose Geographic File as the file type. 4. Choose one or more geographic files such as ccCBSA.Cdf which contains US Metropolitan Statistical Areas (MSAs). 5. Click Open. Map layers in the geographic files are added to the layers in the map. 6. Click Close. Maptitude draws the map with the new layers. The layer list in the Display Manager is updated to include the added layers. If you save the workspace, the new layers will automatically be included in the map the next time you open the workspace. |
|||||||||
|
This month we showcase maps from DrawCongress.org:
If you would like to see your maps showcased here, please contact Caliper. |
|||||||||


 The
The 